Pages

Monday, October 31, 2011

Sugar high...check.

I have to pretty much strap this one down to get a pic.  Mickey Mouse, minus the hat, which is lost...for the second time.  We lost it the first time around when my son wore this costume.  It turned up at my mom's work the next day.  Here we are two years later and it's lost again.


see, they won't stand still long enough to get a photo.

 Unless you're being held down by your extra large, extra strong father.

they hit up this house 3 times.  It's their grandparents.  This neighborhood gives out king size candy bars.  Needless to say we drive over there for the festivities.  The two lucky trick or treaters we had got about a 1/2 bag of candy a piece (as in those extra large bags).  That's the benefits of being the sole trick or treaters in our hood.

Now onto the annual adult Halloween party...these are the pics that made the cut.
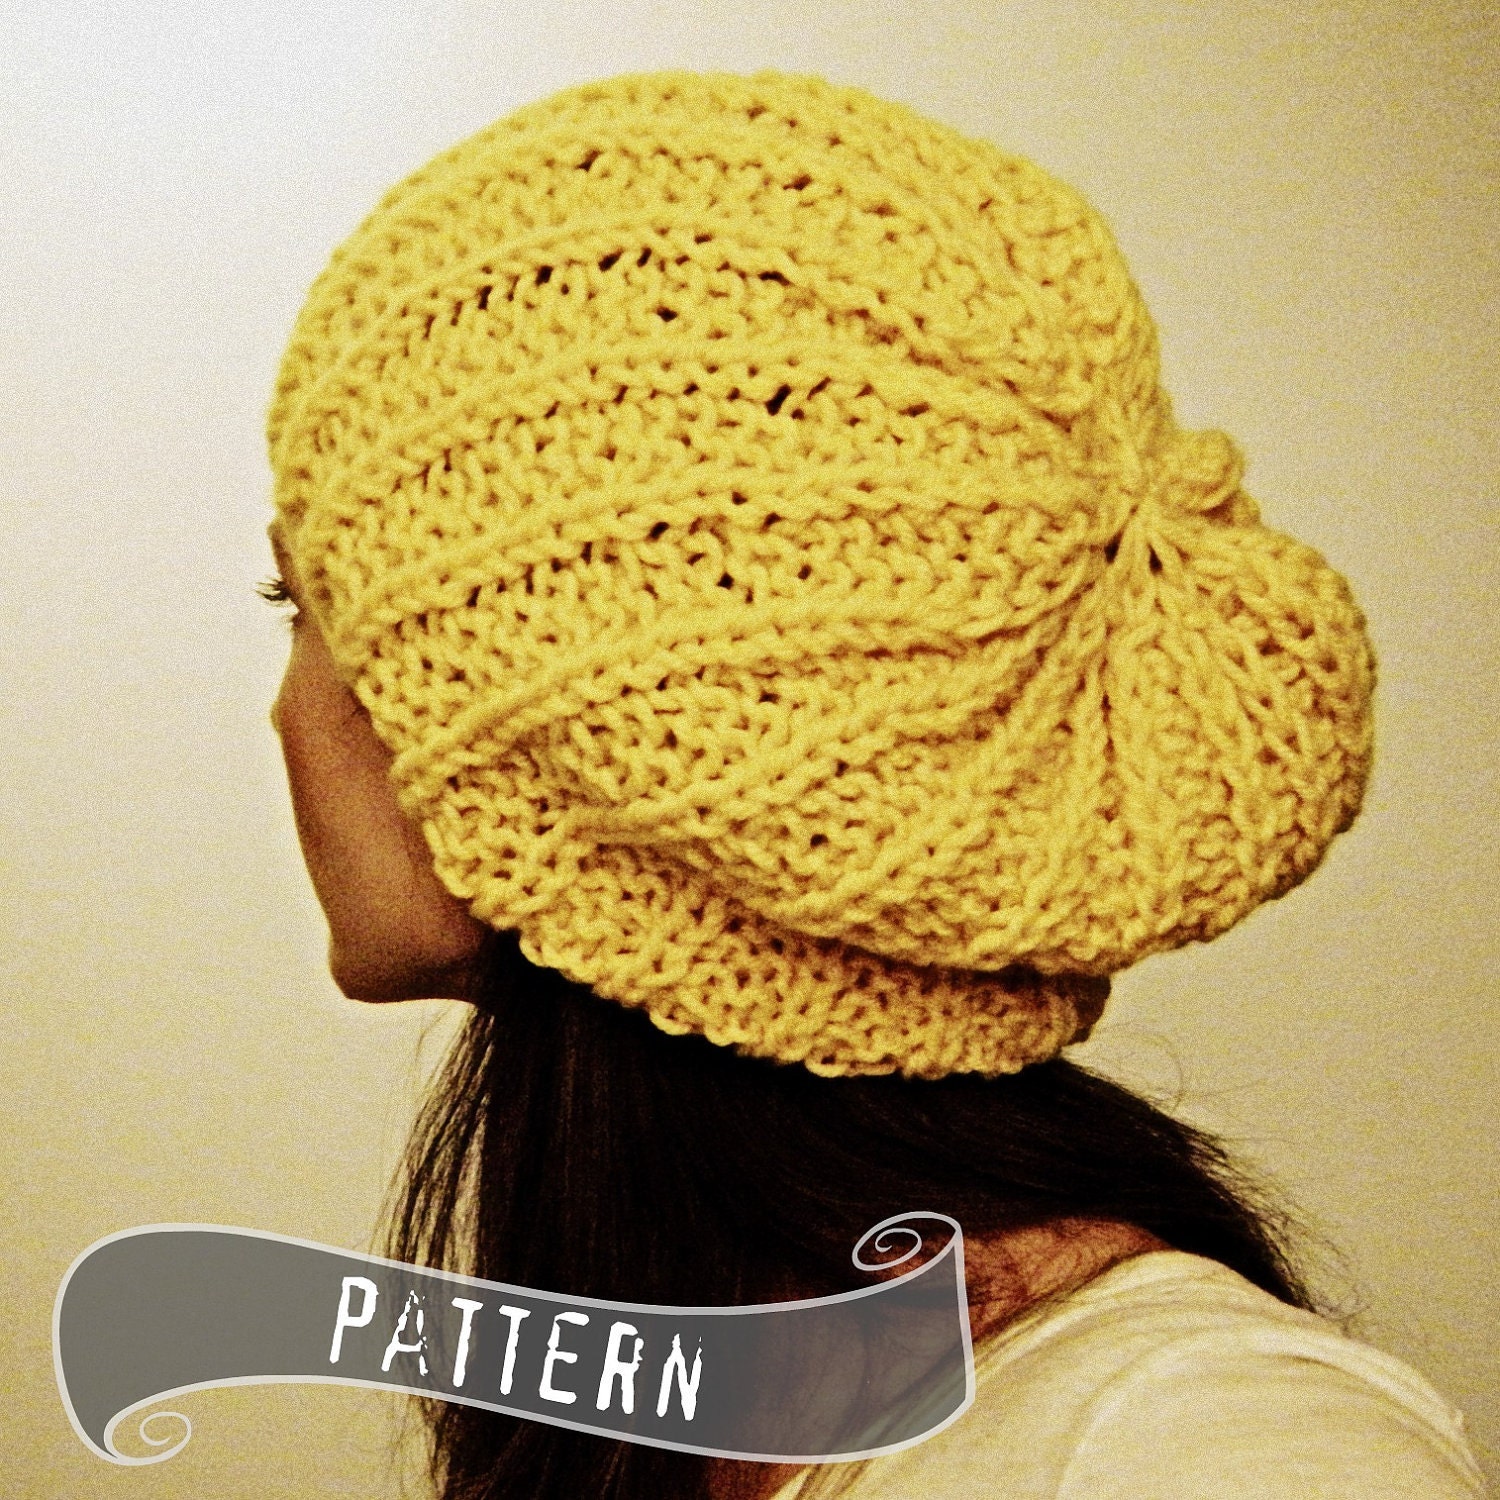
 the ghostbuster was my favorite costume of the night.  Plus the girl is crafty and made it herself, which automatically gets bonus points in my book.  Plus #2, she has an etsy shop and makes awesome stuff with her husband like this.  I want it badly.  Onto the Halloween debauchery...
The one on the right always has the best costumes.  She prepares...she takes time to perfect her outfit.  The one on the left throws crap together last minute, sends her kids to the grandparents house and takes a 30 minute nap.
 and then there are always THESE GIRLS...you know who you are.  But I do love these girls, because they are my girls!  My weekend at the lake girls, my always a good time girls.  Love them!  

 And then there is this girl.  One of my very best girls.  She would murder me if she knew I put this on here, but lucky for me, she doesn't read this!  This is the kind of friend who will make you pee your pants in public from laughing so hard.  And than pee a little more because you cannot stop laughing.  That girl.  I love that girl!  Hope your Halloween was pee your pants kind of fun too!


Thursday, October 27, 2011

Friday Favorite

Kitty Dune was featured on Etsy yesterday.  She is an amazing artist and I want one of each of her pieces.  She also sells patterns, which makes me beyond happy since winter is around the corner and I have a stash of yarn waiting to be turned into something magical.  
Slouch hat PATTERN Shaker hat beanie beret PDF
Knit womens hat grey slouchy hat gray marble
Love, love, love!  Happy Friday!

Saturday, October 22, 2011

DIY Animal Hoods

Has anyone seen these hoods?  I am gaga for them.  I want every single one.  Did you hear me? Every single one.  

I tried my hand at making my own cheap knock off.  Yes cheap, as in looks as cheap as it feels.  But oh, they turned out so cute.  Cheap and cute.  I still want a Spirit hood and imagine it feels like silk and real fur all mixed together (I do believe theirs are acrylic though...but probably high quality acrylic and not the sale bin at Joann's).

All you need is: a couple hours, preferably kid free because they will interrupt you a lot and want you to make other things instead...put the cat out too because she will sit on whatever you are trying to work on, and a room you are OK with destroying because it will get super messy.

Supplies needed:
felt (or any other easy to sew material...I used felt on the kids and thrifted polyester on mine because I new it wouldn't bunch up with the fur)
fur and lining 1/2 yard to 1 yard of each (I had a ton leftover)
felt or any fabric for embellishments
needle
thread
scissors
pins
sewing machine
hooded sweatshirt - the size of the person you are making it for.
 You can see I changed up my lining.  I really wanted to use this fabric but didn't have enough.
 Simply trace the hoodie part and at the nape (where it would sit around your shoulders) cut in a few inches and then continue to cut all the way down the length of the sweatshirt in a straight line to the bottom of your sweatshirt sleeve.  This should give you an accurate spot for little pockets.    You could do it another easy way too...measure.  I don't like to measure though.
 This is what it should like.  
Your pieces will include:

2 pieces each of the lining and fur in the shape of your hood.  

4 pieces of fur in the shape of ears (round for bears, triangles for cats and so on). 

 And 2 smaller pieces of felt or lining fabric for the inside embellishment of ears.

2 pieces of the fur and 2 pieces of lining for the pockets.

If you want to add paws...or little triangles for nails cut duplicates as well.

 add your paws or nails to the bottom of the right side of lining.
 add the felt to the inside of your ears (on the fur side) and stitch together the pockets...lining + fur right sides together.
 stitch the back side of the hood only of both lining and fur right sides together.
after adding your embellishments stich ears right sides together.
 cut any excess fabric on the outside of stitches.
 turn everything right side out.
pin ears on the fur and stitch them in place.  Also add pockets to bottom of "sleeve" (lining side facing fur) and stitch the sides and bottom only.
 Pin right sides of lining and fur together and stitch everywhere EXCEPT back of hood (neck).  This is where you will pull everything through.  I left about a 12 inch opening to make it easy.  Once everything is pulled through stitch the back of the hood shut.
 bottom part.  Pockets are on the other side.
 Wear it wrapped around like a scarf.

 Or draped around you shoulders and stick your hands in the pockets.  Have fun.  If you make one I would love to see it!  


Next up...making an abominable snowman for my son.  He thinks the bear is wack.

Linking up here.


Thursday, October 20, 2011

Advanced Style: Thrifting with Debra!

I had to share this.  It's an old video...but I adore it.  If you haven't checked out the Advanced Style blog, you must.  These women are insane with style and being themselves.  I aspire to have this kind of confidence.  The older I get the more confident I am and the less I worry about what others think.  I have been obsessed with vintage throughout my life but until just recently have I fully felt confident enough to wear most of my finds.  It helps that my hubsand loves it.  I must say, it's very gratifying...even if I get made fun of at work for wearing things that probably belong in 80s Meg Ryan movies, and maybe Dolly Partons 9-5.   Enjoy!
Isn't she fabulous?  Happy Friday!

Sunday, October 16, 2011

DIY Braided Sweatshirt

Ever since this post.  I have been cutting up every sweatshirt I own.  I can't stop.  Here is another easy makeover.


 I added some buttons at the cuff at the last under and over.  I also turned this inside out because there was a stain on the front.  

There you go!  Easy sweatshirt redo.  Linking up here and http://todayscreativeblog.net/
Crafts Keep Me Sane

Friday, October 14, 2011

Thursday, October 13, 2011

Artists Estate Sale

Some goodies from the weekend...
Some vintage purses...some nicer than others. The beaded one on the bottom was free.  Smells of mildew.  Going to see if I can get rid of that smell (suggestions welcome).  The sign says "Save water, shower with your steady".  The glasses are 80s Liz Claiborne and remind me of my own Sally Jesse Raphael's from grade school.  Remember the red ones?  The hat is beautiful and bought more for eye candy and inspiration than anything else.  Also grabbed a little mirror and some feathers.


This box is full of vintage jewelry pieces and trinkets.  I have a future project in mind for them.
Aren't these dolls sweet?  I love the one on the right especially.  The one on the left was in our possession for about 5 minutes before the little one disrobed it.  All the babies in my house stay naked.  I think they are easier to draw on that way.   Anyone find anything good this week?

Click on the I like to party tab and come link up your sweet finds.

Wednesday, October 5, 2011

DIY Woven Sweatshirt

Thanks to Pinterest and the internet, crafters will never be without projects.  I saw this shirt and wanted to do one of my own.

Le Inspiration
source

Then, I saw A is for Ampersand make one of her own out of two sweatshirts.  She made it look super easy so it motivated me to try.  And, I just happened to find some sweatshirts at thrift, so that was a bonus.
Easy = Awesome.


What you need: two sweatshirts, pins, a ruler or good eyeball, sewing machine, not sidewalk chalk...maybe regular chalk though.


I cut two inch strips vertically stopping before the ribbing at the bottom and the seams at the top.  Next, turn you sweatshirt inside out if you haven't already.
After cutting two inch wide strips out of your second sweatshirt weave them in and pin at the sides. Stitch the sides and cut off any excess strips.  And you're done!

It would probably look much cuter, styled...but sometimes a girl simply doesn't have the energy.  I'm keepin it real.

I also made one for my angel.  Instead of cutting straight up and down, I went across and used scalloped edges.  

 see the scalloped edges.  I didn't measure this one...I just eyeballed it.  
 Then I tore strips of this scrap cotton (it was an old sheet), and sewed the strips across the bottom.  Don't forget to turn it inside out to work in the strips of fabric!  
 Weave them through
 Then sew the strips at the top.
If I do another one for her I am going to reduce the width of the strips to about 1 inch...maybe even smaller for this size of sweatshirt.  But she still loves it.

my model is unruly.  On this one I will probably go back and top stitch all of them.  She was already sticking her paws through the openings.

Click on the I like to party tab and come link up your wonderful projects.  Also, don't forget to enter the giveaway!  I will keep it open until next Wednesday.